About This Manual
Screenshots Used in This Guide
Operating System References
Important Notice
Terms
Overview of Production Flow
About the Production Environment of Production Flow
Preparing to Introduce Production Flow
Process Management Using Production Flow
Workflow of Production Flow
Description of Each Screen
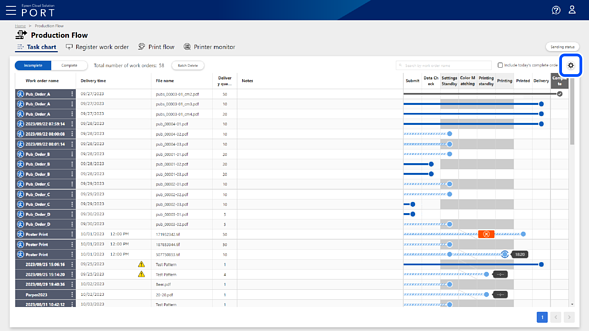
Work Order Management Screen
Configuring the Task Chart
Details of the Work Order Management Screen
Details of the Batch Delete Screen
Details of Each Screen Related to Updating a Work Order
Details of the Edit work order Screen
Details of the Copy work order Screen
Details of the Delete work order Screen
Details of the Register print job file Screen
Details of the Edit file Screen
Details of the Delete file Screen
(Settings) > Workflow Settings Screen / Job Allocation Settings Screen
Create Work Order Screen
Registering a Work Order
Details of the Create Work Order Screen
Print Queue Screen
Making Settings for Print Instructions
Batch Printing Multiple Print Files in a Work Order
Details of the Batch print settings Screen
Spot Color Matching
Specifying Spot Colors and Printing
Defining the Sample Color
Defining the Sample Color by Entering L*a*b* Values
Defining the Sample Color by Measuring L*a*b* Values
Details of the Print Queue Screen
Description of the Progress on the Print Queue Screen
Details of the Print Setting / Presets Screen
Printer monitor Screen
Details of the Printer monitor Screen
Details of the Sending status Screen
Functions Using Epson Edge Print
Remote Printing Function
Printing on a Remote Printer
Print Job Allocation Function
Allocating Print Jobs to Printers
Details of Each Screen Related to Print Job Allocation Function
Details of the Job Allocation Settings Screen
Details of the Register Lead-in Settings/Register Lead-out Settings Screen
Details of the Edit Lead-in Settings/Edit Lead-out Settings Screen
Job Allocation Screen
Details of the Job Allocation - Select Jobs Screen
Details of the Job Allocation - Select Printer Screen
Printing Allocated Print Jobs Individually
Batch Printing Allocated Print Jobs
Batch Print Allocated Jobs Screen
Details of the Batch Print Allocated Jobs > Select Jobs Screen
Details of the Batch Print Allocated Jobs > Print settings Screen
Details of the Job Upload Screen
Appendix
Procedure for Introducing Production Flow
Installing Related Software
Software Selection
Performing Initial Setup of Epson PJ Agent for ECSP
Creating Quick Sets and Hot Folders
Creating Quick Sets for Epson Edge Print
Creating a Hot Folder for Garment Creator
Creating a Hot Folder for Epson Print Automate
Creating a Hot Folder for Epson Print Layout
Registering Hot Folders
Details of the Registering a Hot Folder Screen
Details of the Registration Screen
Epson PJ Agent for ECSP
Operating Environment
Uninstalling Epson PJ Agent for ECSP
Trademarks
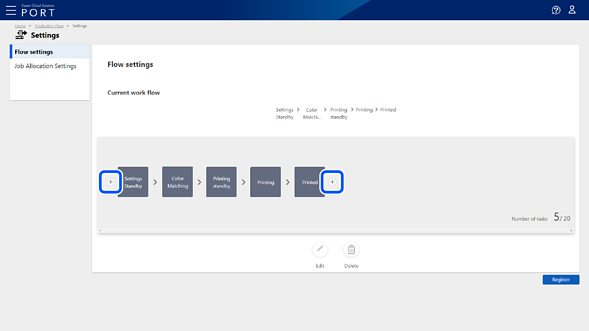
You can register and edit tasks before and after the printing process to configure the task chart.
1Click (Settings button).
2Select Workflow Settings from menu on the left.
The Workflow Settings screen is displayed.
3Click where you want to insert a task.
The printing process (Awaiting Settings, Color Matching, Printing standby, Printing, and Printed) is fixed and cannot be edited.
4Enter the task name on the Task name settings screen, and then click OK.
The task is added.
5Add any additional tasks you want to complete the task chart.
6Click Save Settings.
To edit the task name, select the task, and then click Edit.
To delete a task, select the task, and then click Delete.
To return to the Work Order Management screen without registering, click Production Flow from the breadcrumbs.


 where you want to insert a task.