This section explains how to issue print instructions for print files in the work order that were registered using Production Flow. You can perform distributed printing using multiple printers and spot color matching in the printing process.
Batch Printing
You can batch print multiple print files in a work order by applying the same print settings.
See the following for the batch printing procedure.
You can specify a specific color (spot color) contained in the PDF file and match the printed color to the sample color before
the actual printing. Spot color matching can only be performed on one printer.
See the following for details on spot color matching.
Before you are doing any work on the Print Queue screen, you need to start the digital front end used for printing.
1Start the digital front end used for printing.
Epson Edge Print:
Click the start button in Windows, and then select Epson Software > Epson Edge Print to start Epson Edge Print.
Garment Creator:
Click the start button in Windows, and then select Epson Software > GCEPS to start Garment Creator Easy Print System.
Epson Print Automate:
Click the start button in Windows, and then select Epson Software > PAEPS to start Print Automate Easy Print System.
Epson Print Layout:
Click the start button in Windows, and then select Epson Software > PLEPS to start Print Layout Easy Print System.
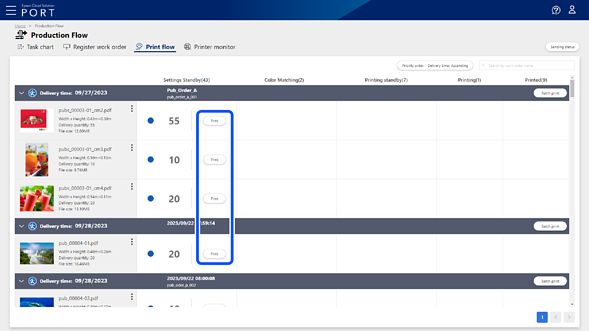
2Click Print Queue to display the Print Queue screen.
3Click Print on the line of the print file you want to print.
Note:
To display the print file information on the Print Queue screen, the task on the Work Order Management screen must have advanced to Awaiting Settings.
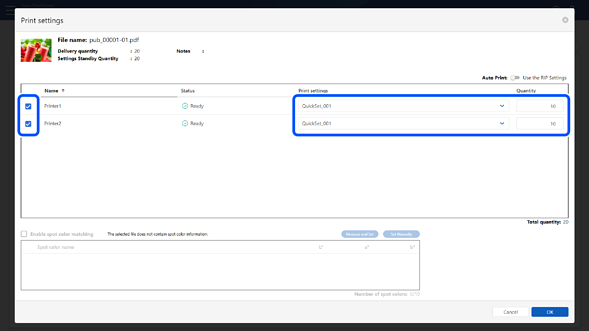
4Select the printer you want to use for printing, select the print settings from Print Setting / Presets, and then enter the number of copies you want to print.
To perform distributed printing, enter the number of copies you want to allocate to multiple printers.
Note:
The print settings are the names of Quick Sets (for Epson Edge Print), presets (for Epson Print Automate) and hot folders (for other digital front ends) registered to Epson Cloud Solution PORT using Epson PJ Agent for ECSP.
5Click Print.
The Check printed content screen is displayed.
6Check the displayed contents, and then click Print.
The destination printer is instructed to start printing.
The Printing standby column displays the number of copies that you have instructed to print and the status of the task. See the following for
details about the status displayed in the Printing standby column.