
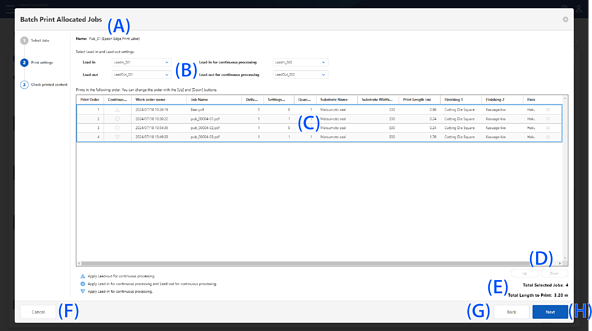
Details of the Batch Print Allocated Jobs > Print settings Screen
This is displayed when you click the Next button on the Batch Print Allocated Jobs > Select Jobs screen. Note that the Batch Print Allocated Jobs > Select Jobs screen is displayed when you click the Batch Print Allocated Jobs button on the Print Queue screen.
You can set the print order for the selected printer.
|
Item |
Description |
||
|---|---|---|---|
|
A |
Printer Name |
Displays the name of the printer and the RIP used to print the allocated print jobs. |
|
|
B |
Lead-in, Lead-out |
Displays the registered Lead-in settings and Lead-out settings when using the RIP for the Label Press. Select the Lead-in and Lead-out settings you want to use for printing. You can configure Lead-in and Lead-out settings in |
|
|
Lead-in for continuous processing, Lead-out for continuous processing |
Displays the registered settings for Lead-in for continuous processing and Lead-out for continuous processing when using the RIP for the Label Press and Continuous Processing is set to Enable in Select the Lead-in for continuous processing and Lead-out for continuous processing settings you want to use for printing. You can configure the Lead-in and Lead-out settings for continuous processing in |
||
|
C |
Print job list |
Displays the print job selected on the Select Jobs screen. The displayed items other than Print Order and Continuous Processing are the same as those on the Select Jobs screen. |
|
|
Print Order |
Displays the print order of the print jobs. You can change the order of the print jobs by selecting a print job and clicking Up or Down. |
||
|
Continuous Processing |
Displays the status of applying Lead-in for continuous processing and Lead-out for continuous processing when Continuous Processing is set to Enable in |
||
|
D |
Up / Down |
To change the order of print jobs, select a print job and click Up or Down. |
|
|
E |
Total Selected Jobs |
Displays the number of selected print jobs. |
|
|
Total Length to Print |
Displays the total length of the selected print jobs. The lengths of the selected Lead-in and Lead-out are added when using a RIP for the Label Press. When Continuous Processing is enabled, the length of the continuous processing portion is the total length of Lead-in for continuous processing and Lead-out for continuous processing. |
||
|
F |
Cancel |
Click to cancel the print settings and close the screen. |
|
|
G |
Back |
Click to return to the Select Jobs screen. |
|
|
H |
Next |
Click to apply the print settings and proceed to the Check printed content screen. |
|