Registering a Work Order
You can register a work order to be managed in Production Flow.
-
Click Create Work Order to display the Create Work Order screen.
-
Set each item.
See the following for more details.
-
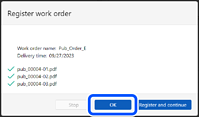
Click Submit.
The print file is uploaded. When the upload is complete, the buttons on the confirmation screen are enabled.
Note:Even after registering the work order, you can make changes such as adding or deleting print files or changing the total number of copies to be printed from the Work Order Management screen.
The following explains the meanings of the icons displayed while uploading a print file.
-
 : File is being uploaded.
-
 : File upload is complete.
-
 : File upload failed.
-
 : File upload has been canceled.
When uploading print files, you can click Stop to stop the file uploads. Print files that have already been uploaded are added to the work order.
-
-
Click OK.
The Work Order Management screen is displayed.
Note:If you click Register and continue, the Create Work Order screen is displayed, and then you can continue to register a new work order.