Printing on a Remote Printer
-
Log in to Epson Cloud Solution PORT, and then select Production Flow on the Home screen.
-
Select
 (Settings) > Job Allocation Settings on the Work Order Management screen, and then set Job Allocation Settings > Job Allocation to Disable.
Note:
(Settings) > Job Allocation Settings on the Work Order Management screen, and then set Job Allocation Settings > Job Allocation to Disable.
Note:Click Production Flow from the breadcrumbs to return to the Work Order Management screen.
From the next step, perform the operations on the source Epson Edge Print.
-
Create a print job on the source Epson Edge Print, and then open the Job Upload screen.
For Epson Edge Print operations, see the Epson Edge Print help.
-
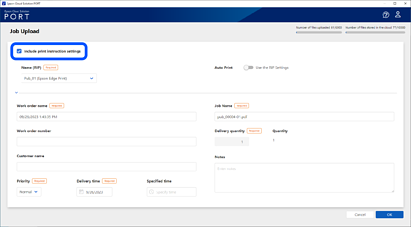
Select Include print instruction settings.
-
Select a destination printer from Name (RIP), and then select Auto Print or Use the RIP Settings.
When set to Auto Print, printing starts when a print job is sent, regardless of the automatic printing settings on the destination Epson Edge Print.
When set to Use the RIP Settings, you can print according to the automatic printing settings on the destination Epson Edge Print.
-
Set each item, and then click OK.
See the following for details on each item.

The destination printer is instructed to start printing.
The Printing standby column displays the number of copies you have set and the status of the tasks. See the following for details about the status displayed in the Printing standby column.
-
If you did not select Auto Print in step 5 or have not set automatic printing on the destination Epson Edge Print, start printing on the destination Epson Edge Print.
-
You can check the progress of the entire process for each print file on the Work Order Management screen.
-
You can check the information for each printer on the Printer monitor screen.