
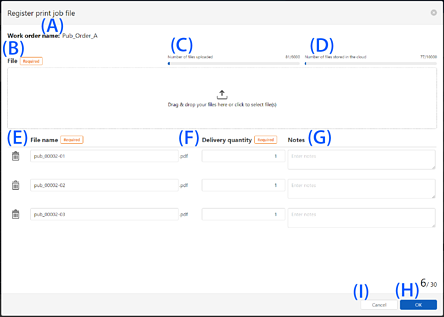
Details of the Register print job file Screen
This is displayed when you click  next to the work order name on the Work Order Management screen, and then select Add file. Note that the Add file menu is displayed when In-progress is selected for the work order display switching button on the Work Order Management screen.
You can add the print files to the selected work order.
|
Item |
Description |
|
|---|---|---|
|
A |
Work order name |
Displays the selected work order name. |
|
B |
File(s) |
Select the print file that you want to upload to Epson Cloud Solution PORT. You can select multiple print files at once. The maximum size of one file is 3 GB. Up to 30 print files can be uploaded in one work order. If you want to upload more print files, divide them into multiple work orders. |
|
C |
Uploaded Files |
Displays the number of uploaded print files for the number of print files that can be uploaded with the contracted plan. |
|
D |
Stored Files |
Displays the number of saved print files in the cloud for the number of print files that can be saved with the contracted plan. |
|
E |
File name |
Displays the name of the print file selected in the File(s) field. You can edit the file name. You can cancel the print file selection by clicking |
|
F |
Delivery Copies |
Enter the total number of copies to print for each print file. Click the up and down arrows |
|
G |
Notes |
Enter a note for each print file. |
|
H |
OK |
Click to register the additional print files to the work order. |
|
I |
Cancel |
Click to cancel changes and return to the Work Order Management screen. |
 .
.
 to increase or decrease the number.