
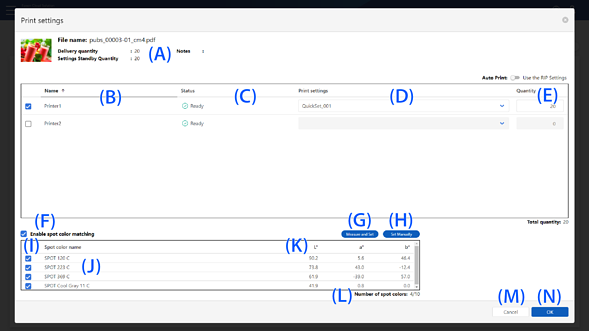
Details of the Print Setting / Presets Screen
This is displayed when you click the Print button in the Awaiting Settings column on the Print Queue screen.
You can set the printer you want to use, the print settings, and the number of copies to print. You can use multiple printers to distribute the number of copies to be printed among them.
Also, if the PDF print file contains spot color information, you can perform spot color matching before printing.
|
Item |
Description |
|
|---|---|---|
|
A |
File name |
Displays the print file name. |
|
Delivery Copies |
Displays the total number of copies to print the print file. |
|
|
Awaiting Settings Copies |
Displays the number of copies for the print files that have not yet been printed. |
|
|
Notes |
Displays the notes set for the print file. |
|
|
Auto Print |
Set automatic printing for Epson Edge Print or Epson Print Automate together. This setting is valid when using Epson Edge Print or Epson Print Automate. When set to On, printing starts when printing instructions are issued in Production Flow, regardless of the automatic printing settings in Epson Edge Print or Epson Print Automate. When set to Off (Use the RIP Settings), the automatic printing settings in Epson Edge Print or Epson Print Automate are used. If you want to check the print layout, set this to Off (Use the RIP Settings), and turn off the automatic printing settings in Epson Edge Print or Epson Print Automate. In this situation, you can perform printing after checking the print layout in Epson Edge Print or Epson Print Automate. |
|
|
B |
Printer Name |
Displays the registered name of printers available for Epson Cloud Solution PORT. If no registered name has been set, the serial number of the printer is displayed. When this is selected, you can select the Print Setting / Presets and the Copies. |
|
C |
Printer Status |
Displays the status of each printer.
Offline: The printer is offline. Other: A status other than printing, waiting, error, or offline, such as during maintenance or cleaning, has occurred. |
|
D |
Print Setting / Presets |
Select the Quick Sets or hot folder created with the digital front end, such as Epson Edge Print. For print files uploaded using Epson Edge Print, the item name changes to RIP. |
|
E |
Copies |
Enter the number of copies you want to print for each printer. Click the up and down arrows |
|
M |
Cancel |
Click to cancel the print settings and return to the Print Queue screen. |
|
N |
|
Click to display the Check printed content screen. When you click the Print button on the Check printed content screen, a print instruction is issued. |
|
F |
Enable spot color matching |
Select to set spot color matching. |
|
G |
Measure and Set |
Click to display the Set Sample Color: Measure and Set screen, where you can define the sample color using an Epson Spectrometer and a spectrophotometer. |
|
H |
Set Manually |
Click to display the Set Sample Color: Set Manually screen, where you can define the sample color by entering the L*a*b* values manually. |
|
I |
Checkbox |
Select the spot color that you want to match to the sample color. |
|
J |
Spot color name |
Displays the spot color names contained in the PDF file. |
|
K |
L*, a*, b* |
Displays the L*a*b* values of the spot color. |
|
L |
Number of spot colors |
Displays the number of spot colors selected for spot color matching. |


 to increase or decrease the number. You can enter this item when using the Quick Sets or hot folder created with a digital
front end that supports the number of copies setting, such as
to increase or decrease the number. You can enter this item when using the Quick Sets or hot folder created with a digital
front end that supports the number of copies setting, such as You can perform the following operations by selecting Enable spot color matching.
-
You can set spot color matching when the print file is a PDF file and the PDF file contains spot color information.
-
This cannot be set when performing distributed printing with multiple printers.
-
You can specify up to 10 spot colors at the same time.
-
You cannot use spot color matching for print files uploaded using Epson Edge Print.