
Specifying Spot Colors and Printing
This section explains the printing procedure for spot color matching.
-
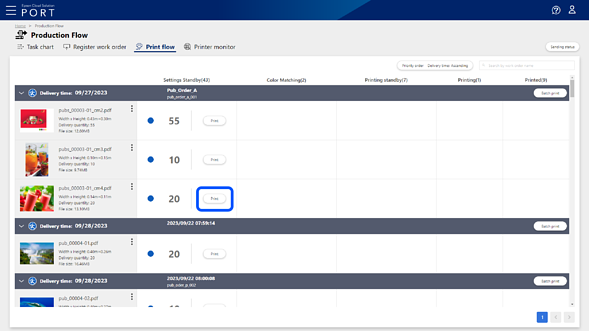
Click Print Queue to display the Print Queue screen.
-
Click Print on the line of the print file you want to print.
Note:To display the print file information on the Print Queue screen, the task on the Work Order Management screen must have advanced to Awaiting Settings.
-
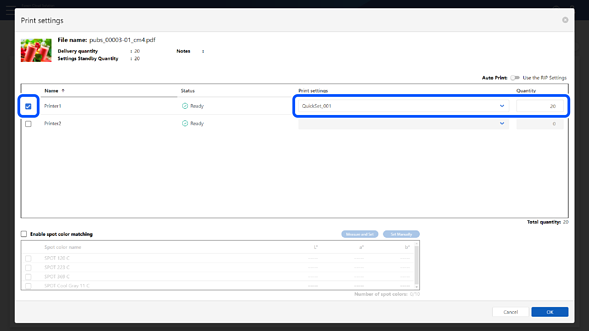
Select Auto Print or Use the RIP Settings.
When set to Auto Print, printing starts when a print job is sent, regardless of the automatic printing settings on the destination Epson Edge Print.
When set to Use the RIP Settings, you can print according to the automatic printing settings on the destination Epson Edge Print.
-
Select the printer you want to use for printing, select the print setting from Print Setting / Presets, and then enter the number of copies to be printed.
You only need to select one printer.
Note:The print settings are the names of Quick Sets created using Epson Edge Print and registered to Epson Cloud Solution PORT using Epson PJ Agent for ECSP.
-
Select Enable spot color matching.
Note:Check the following if you cannot select Enable spot color matching.
-
Is the selected print file a PDF file in a supported format?
If it is a PDF file, does it contain spot color information?
-
Is the printer selected?
-
Is only one printer selected?
-
Is the print settings selected?
-
Does the selected print settings support spot color matching?
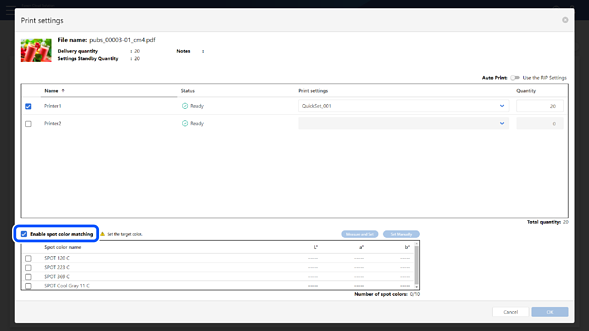
The spot color information contained in the PDF file is displayed in the list.
-
-
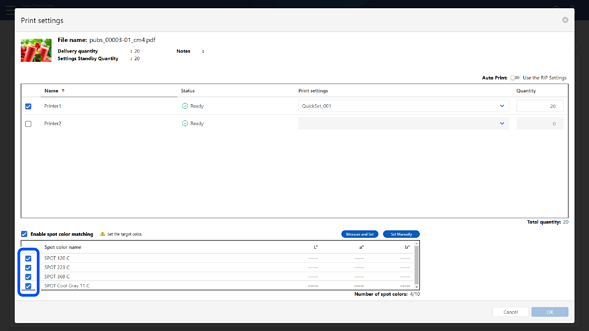
Select the spot color that you want to match to the sample color.
You need to define the L*a*b* values for the sample color in advance. See the following for details on how to define the sample color.
-
Click Print.
Note:If you select a spot color without an L*a*b* value, you cannot click Print.
The Check printed content screen is displayed.
-
Check the displayed contents, and then click Print.
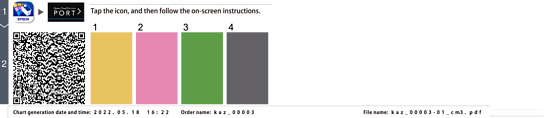
The printer prints a chart with a QR code and color patches. The numbers of the color patches on the chart correspond to the order of the spot colors listed from top to bottom.
-
Check that the status displayed in the Color Matching column on the Print Queue screen is Standby spot color measurement.
Note:By clicking
 in the Color Matching column, you can cancel the color matching and return the task for the print file to Awaiting Settings.
From the next step, perform the operations on your smartphone or tablet.
-
Tap the icon for Epson Spectrometer (iOS:
 Android:
  ) on your smartphone or tablet to run Epson Spectrometer.
-
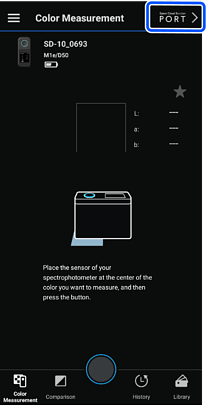
Connect to your spectrophotometer.
-
Tap
 .
Note:
.
Note:When the Epson Global ID - Login screen is displayed, enter the email address and password associated with Epson Cloud Solution PORT and tap Login.
-
Select Spot Color Matching.
The screen for reading the QR code is displayed.
-
Follow the on-screen instructions to perform spot color matching.
-
Check that spot color matching is complete on the Print Queue screen.
When spot color matching is complete, the number of copies you have set is displayed in Printing standby. When printing starts, the status advances to the right according to the progress.
Note:If spot color matching is not complete, a color measurement error is displayed in the Color Matching column on the Print Queue screen. Click Color measurement error, select an appropriate solution from the screen displayed, and then click OK.


-
If you did not select Auto Print in step 3 or have not set automatic printing on the destination Epson Edge Print, start printing on the destination Epson Edge Print.
-
You can check the progress of the entire process for each print file on the Work Order Management screen.
-
You can check the information for each printer on the Printer monitor screen.