
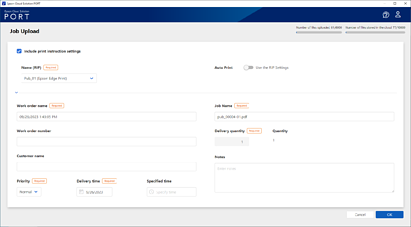
Details of the Job Upload Screen
|
Item |
Description |
|---|---|
|
Uploaded Files |
Displays the number of uploaded print files for the number of print files that can be uploaded under the contracted plan. |
|
Stored Files |
Displays the number of saved print files in the cloud for the number of print files that can be saved under the contracted plan. |
|
Include print instruction settings |
Select to include the print instructions when uploading a print job. You do not need to make the print instructions on the destination Epson Edge Print. This is displayed when |
|
Name (RIP) |
Select the destination printer. You can select a printer that matches the model of the print job being uploaded. This is displayed when Include print instruction settings is selected. |
|
Auto Print |
Batch set automatic printing for the Epson Edge Print to which the destination printer is connected. When set to Auto Print, printing starts when a print job is sent, regardless of the automatic printing settings on the destination Epson Edge Print. When set to Use the RIP Settings, the automatic printing settings on the destination Epson Edge Print are used. If you want to check the print layout, set this to Use the RIP Settings and turn off automatic printing on the destination Epson Edge Print. In this situation, you can make print settings after checking the print layout on the destination Epson Edge Print. This is displayed when Include print instruction settings is selected. |
|
Work order name |
Enter a work order name. You can enter up to 64 characters. |
|
Work order number |
Enter a work order number. You can enter up to 64 characters. |
|
Customer name |
Enter a customer name. You can enter up to 64 characters. |
|
Priority |
Select the priority of the work order. The following happens when you select High.
|
|
Date / Time |
Click to display the calendar, and then select a date. To specify a time, select the time in Delivery Time or enter the time directly. Click |
|
File name |
Displays the print job name specified in Epson Edge Print. You can edit this name. You can also use a name without an extension for print jobs specified in Epson Edge Print. |
|
Delivery Copies |
Enter the total number of copies for the print job. You can enter up to 999,999 copies for a print job specified in Epson Edge Print. This cannot be entered when Include print instruction settings is selected. |
|
Copies |
Displays the number of copies for the print job specified in Epson Edge Print. This cannot be edited. |
|
Notes |
Enter a note for the print job. |
 icon is displayed next to the work order name on the
  to clear the specified time. If you do not specify a time, the time is not displayed in the delivery time.